Switch back to German
Configuration
Activate the Marketplace Module
How to:
-
Go to Extensions > Modules and click on Dixeno – Marketplace.
-
In the window below, click the Overview tab.
-
Click the Activate button.
The module is active if you see a green check mark.
Configure Novalnet
You must edit the Vendor script URL in your Novalnet backend so that the interface to Novalnet is working. The Vendor script URL enables Novalnet to communicate with the marketplace. For example, when the customer pays for his order and thus sends the money to Novalnet, Novalnet sends the message via the URL to the marketplace that the money has been received.
How to:
-
In your Novalnet backend, go to Project Overview and enter the marketplace URL into the Vendor script URL field. For example, if the marketplace is marketplace.example, the URL is:
https://www.marketplace.example.com/?cl=novalnetCallback\&fnc=handleRequest
Payment Processing with PayPal via Novalnet
It is possible to have the PayPal payment method processed with Novalnet. This has the following advantage:
Both the marketplace operator and the merchants have all transactions and payments completely listed in their Novalnet backends. In the Novalnet backends, it is possible to export them in different data formats for further processing in accounting.
Note: In order for payment processing to work, each merchant selling on the marketplace must have their own PayPal business account. For such a business account, the merchant can request the PayPal API data (which consists of an API username, an API password and a signature) after logging into their PayPal account. This data must then be entered in the Novalnet contract portal.
The following points should be noted here:
-
When a customer places an order on the marketplace and pays via PayPal, the money is transferred to the account of the merchant with deduction of PayPal fees.
-
Novalnet tracks the external direct payment between the merchant and PayPal and lists the payment in the Novalnet merchant backend.
-
A cost nota for the commission to be paid to the marketplace operator is created and booked accordingly as a payable amount/cost nota in the Novalnet merchant backend.
-
At the same time, the determined commission amount is credited to the account of the marketplace operator including the merchant data for payment.
-
The resulting negative balance on the merchant's account will be retained or deducted from the payout amount after receipt of the next positive payments. As a result, the merchant account with Novalnet will be balanced again accordingly.
-
For these services, Novalnet charges the merchant the discount and transaction fees.
Define Payment Methods, Shipping Methods and Shipping Countries
You need to define on your marketplace which payment methods, shipping methods and shipping countries are possible.
Define Payment Methods
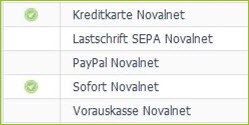
You must enable the payment methods that a customer can choose at check-out. If Novalnet handles the payment method, it transfers the payment method to your OXID backend and you see a name addition such as Novalnet:
Make sure your merchants support the enabled payment methods so that a customer can order mixed shopping carts on the marketplace. Merchants must enter their individual payment method parameters in their Novalnet admin portal.
Note: If a merchant's parameters for a particular payment method are missing or the parameters are incorrect, this will result in an error when checking out with that merchant. A purchase can then not be completed.
How to:
-
Go to Shop Settings > Payment Methods.
You will see a mask in the lower area of the Main tab where you can enter data for the payment method.
-
Fill in the fields.
For more information about the fields, please refer to the OXID Online Help (v.6.2).
Activate the Aktive option to make the payment method available on the marketplace.
-
Click on Save.
-
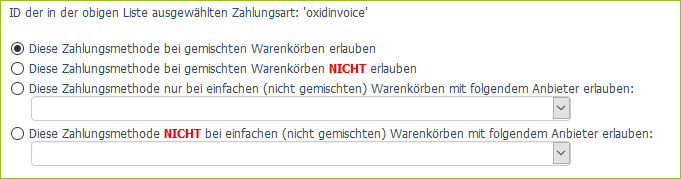
By default, the payment method is available in mixed shopping carts. To change this setting, click the Marketplace tab.
Caution: The payment modules must be configured accordingly for the selected setting. A wrongly configured setting can make the check-out impossible. Therefore, you should only change the settings with appropriate knowledge.
-
Click on Save.
Define Shipping Types
You need to define the possible shipping methods for the marketplace and which payment methods are possible for each shipping method. The merchants then configure the shipping methods themselves in their merchant backend.
Add Shipping Types
How to:
-
Go to Shop Settings > Shipping Methods.
In the lower section of the Main tab, you will see the Name field.
-
In the Name field, enter the shipping method, for example, Pickup and click Save.
-
To display a logo for the shipping method in the merchant backend, click the Marketplace tab, upload a logo, and click Save.
Assign Payment Methods to Shipping Methods
How to:
-
Go to Shop Settings > Shipping Methods and select a shipping method.
-
Click the Payment tab and then click the Assign Payment Methods button.
A two-column window will open showing you all payment types, i.e., both active and inactive payment types, in the left column. Under Cost you can see the markup or markdown for the payment method.
-
Select a payment method and drag and drop the payment method to the right column:
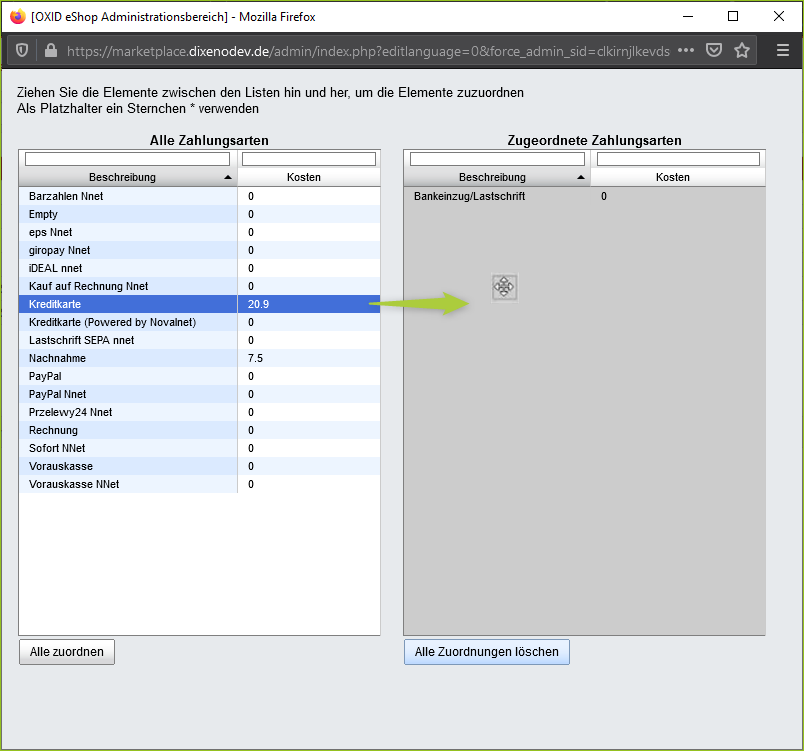
The payment method was assigned to the shipping method.
You can also hold the Ctrl key, select multiple payment methods and drag and drop them.
-
Close the window.
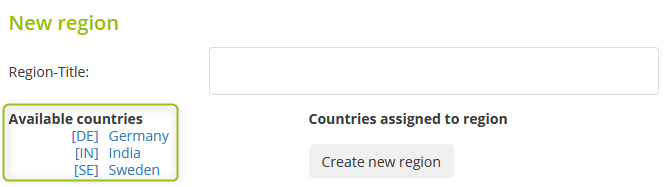
Define Shipping Countries
On the one hand, you need to define which shipping countries there are, and on the other hand, which shipping methods these countries are associated with.
Add Shipping Countries
How to:
-
Go to Master Settings > Countries.
-
Click on the country that you can ship to.
-
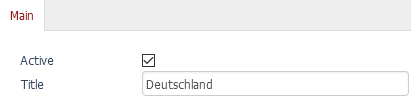
In the lower section of the Main tab, activate the Active option:
-
Click on Save.
Merchants can see the enabled countries in their merchant backend under Configuration > Shipping > Shipping-Regions and can group these countries into shipping regions to define consistent shipping rules:
Assign Shipping Methods to Countries
How to:
-
Go to Shop Settings > Shipping Methods and select a shipping method.
-
Click the Main tab and then click the Assign Countries button.
A two-column window will open showing you all enabled countries in the left column.
-
Select a country and drag and drop the country to the right column:
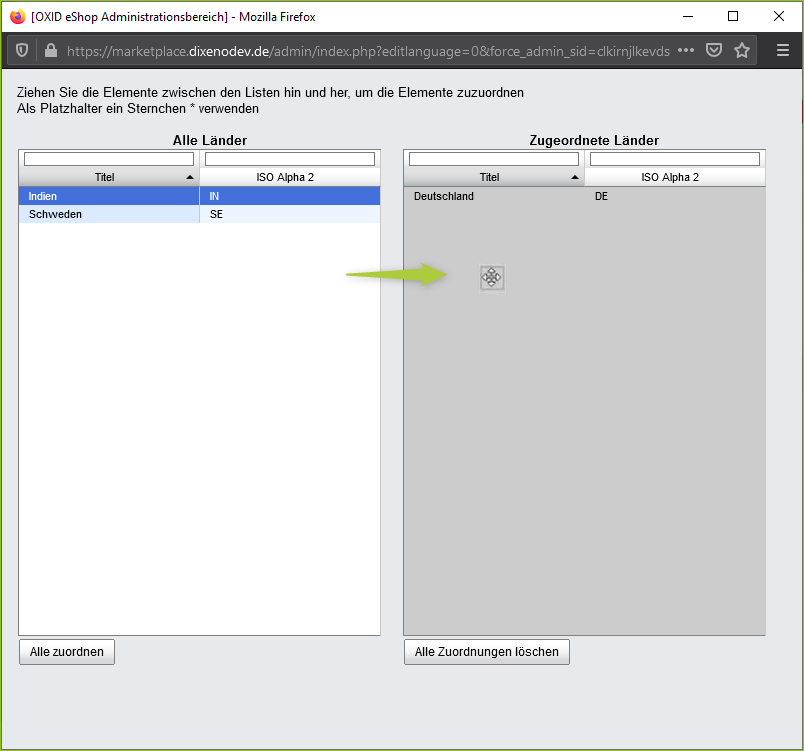
The country was assigned to the payment method.
You can also hold the Ctrl key, select multiple countries and drag and drop them.
-
Close the window.
Set up Cronjobs
To perform some actions automatically on a regular basis, you should create the following cronjobs (replace marketplace.example with your marketplace):
| Cronjob | Scope |
|---|---|
https://marketplace.example.com/index.php?cl=dx_marketplace_extvatidcheck_cron |
Checks "USt-ID" (VAT ID) |
https://marketplace.example.com/index.php?cl=dx_marketplace_cron&fnc=check_payments |
Processes incoming payments |
https://marketplace.example.com/index.php?cl=dx_marketplace_cron&fnc=dx_check_storno |
Processes cancellation requests |
https://marketplace.example.com/index.php?cl=dx_marketplace_cron&fnc=cron_calcvisitors |
For statistics in the merchant backend |
https://marketplace.example.com/index.php?cl=dx_marketplace_cron&fnc=dx_check_shipping |
Deletes old shopping carts, removes bots from the site visitors table and checks delivery status of orders |
https://marketplace.example.com/index.php?cl=dx_marketplace_cron&fnc=calc_provisions |
Calculates sales commissions |