Switch back to German
Orders
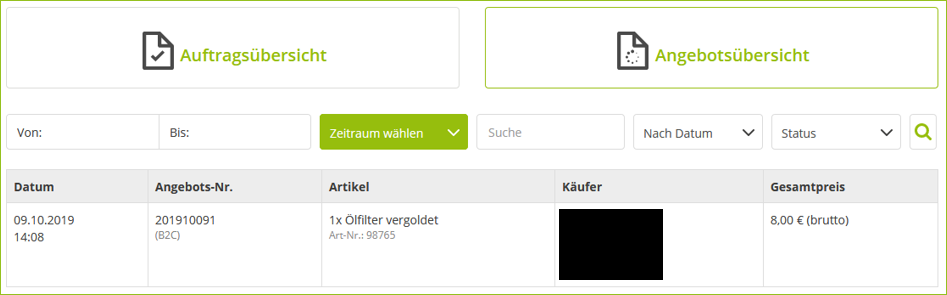
In the menu option Orders you get an overview of all orders and offers. You can view more details of each order or offer. In addition, orders and offers can be filtered.
Note: When you receive an order, an e-mail is also sent to you with information about the ordered goods and the customer data. You will see in the email only the information related to your goods and not the information related to other merchants if the customer ordered a mixed shopping cart.
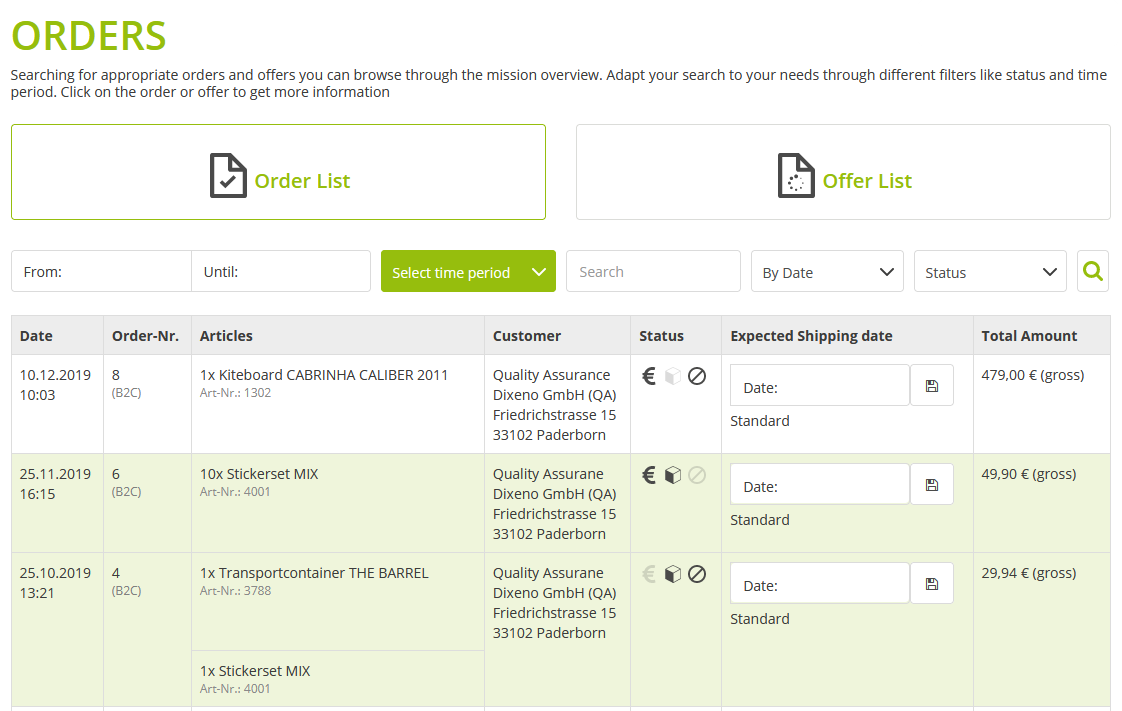
Order List
In the Order List you can see all orders received and commission bills. Orders with the status shipped are highlighted in light green in the table.
About the Status Values
As soon as the order assumes a status, the status is highlighted.
| Status | Description |
|---|---|
|
Paid The customer has paid for the order. The payment status is transmitted by the respective payment method (e.g., PayPal). The Paid status is automatically set by the connection to the payment service provider. |
|
Shipped You have entered shipment data for the order. |
|
Canceled You have canceled the order. Please note that the market operator must approve a cancellation so that the status is set to active. |


See also:
Send Order
Cancel Order
Order in Detail
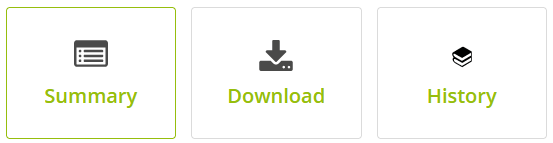
To view an order in detail, click on an order in the table and a new menu will open:

| Option | Description |
|---|---|
Summary |
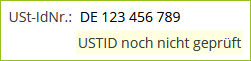
Here you get an overview of billing address and order data. You will also see the "USt-ID" (VAT ID) here, which you can have checked. |
| Notes | Here you can see if the customer has added a note to the order. You can edit the note. Once a note has been saved, you will see a check mark. |
| Shipping | Here you can manually enter shipment data or create UPS labels. |
| Cancel / Return | Here you can cancel orders or process a return. |
| Download | Here you can download the order as a JSON file. |
| History | Here you can see when and by whom the order was created, shipped, canceled or retrieved via API. |
Check "USt-ID" (VAT ID) manually
The system automatically checks the customer's "USt-ID" (VAT ID) for each order. You can also manually enter the customer's VAT ID for an order and have it checked.
About the "USt-ID" (VAT ID)
The "Umsatzsteuer-Identifikationsnummer (USt-ID)" (VAT identification number (VAT ID)) is a number that companies apply for in addition to their tax number or tax ID. The VAT ID uniquely identifies each company within the European Union (EU). The VAT ID is relevant for invoicing if you conduct B2B business within the EU. This is because the VAT ID can be used to correctly handle sales taxation for transactions between EU countries. Both the invoicing party and the customer must indicate their VAT IDs on the invoice.
Note: Please check with your tax advisor if you need a VAT ID.
According to EU requirements, the VAT ID always contains a two-digit country designation according to ISO (e.g. DE, EN), followed by a maximum of 12 digits, whereby numbers and letters are permitted.
Example:
DE123456789
IE1234567U
Why Marketplace Merchants Should Check the ID
If you send an order to a business customer in another EU country, you usually do not have to pay VAT. The business customer is responsible for the payment of sales tax in accordance with its country-specific requirements. To prevent fraud, the tax office requires you, as the biller, to verify the VAT ID and address information provided by the customer. If you do not check the data and it turns out to be incorrect, you may be liable for sales tax as the biller.
How to:
-
Go to Orders and open an order.
You will receive an overview of the order. In the VAT-ID Nr. field you can see the VAT ID.
-
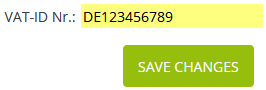
Click in the field and edit it to get more options:
-
Enter the ID and click the Save changes button.
You will receive a message whether the VAT ID is valid or not. If it is unclear or invalid, you must clarify the data with your customer and enter the correct data.
Send Order
You can make notes on each job before you send it. An order is considered shipped when it has a delivery date, a shipping method, a tracking number if applicable, and a label. This information is called shipment data.
You have 3 ways to send an order:
-
You handle the shipment in another system and have the shipment data imported via an API.
-
You add the shipment data manually.
-
You create a UPS label (special case manual shipment data).
Add Shipment Data via API
An external system transmits the shipment data. Via the API you will see this data automatically in your merchant backend under Orders > Shipping at the respective order:

To inform the customer about the delivery date, you just need to add the expected delivery date for the particular order.
How to:
-
Go to Orders > Order List.
-
In the Expected Shipping date column, enter the date and click
 Save.
Save.
Add Shipping Data Manually
If you do not use an API to get shipment data, you must enter the data yourself for each order.
Prerequisites:
- For UPS: you have stored your credentials in the backend, see UPS Settings.
How to:
-
Go to Orders >Order List and click on an order.
-
Click on the Shipping option.
-
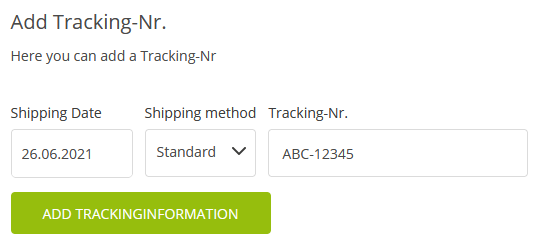
Enter the shipping date, shipping method and tracking number.
Be sure to specify the shipping date in the format day.month.year, e.g., 24.01.2020.
-
Click the Add trackinginformation button.
The shipment data appears in the table under Shipping Information:

In addition, the order changes to the status shipped in the order overview and is highlighted in green.
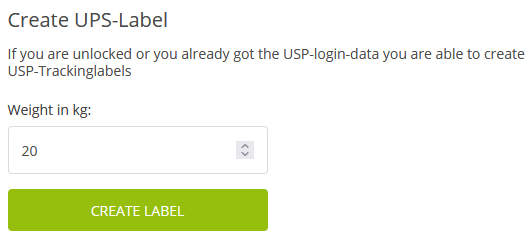
Create UPS Label
Sending the order by creating a UPS label is a special case. If you want to ship via UPS, you can usually create UPS labels directly in your ERP and don't need to do it in your merchant backend. However, if you do not use an ERP or your ERP does not support UPS, you can create UPS labels in the merchant backend and use them to trigger the shipment of the order.
The shipping method and tracking number are then pulled from the UPS label. The delivery date is set to the current day.
Prerequisites:
- For UPS: you have stored your credentials in the backend, see UPS Settings.
How to:
-
Go to Orders >Order List and click on an order.
-
Click on the Shipping option.
-
Enter the weight of the package under Weight in kg and click Create label.
The shipment data appears in the table under Shipping Information. The label is linked in the label column in case you need to print it again, for example. In addition, the order changes to the status shipped in the order overview and is highlighted in green.
Cancel Order
You can cancel the entire order or only individual quantities. The marketplace operator must approve every cancellation.
Caution: The cancellation of an order or individual order products does not simultaneously lead to a refund of the invoice amount. If it is a payment processed through the PSP Novalnet AG, please log in to your customer backend https://admin.novalnet.de of Novalnet for this purpose and refund the corresponding invoice amount there.
How to:
-
Go to Orders > Cancel / Return.
-
To cancel the entire order, click the Cancel complete order button.
-
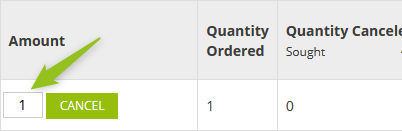
To cancel individual quantities of the order, enter the quantity under Amount and click the Cancel button:
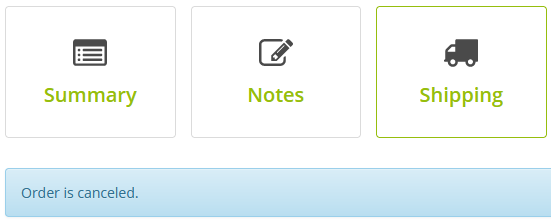
You have sent a cancel request to the marketplace operator. Once the marketplace operator confirms the cancellation request, you will see a message under Orders > Shipping that the order has been canceled:
If you have already shipped the goods and the customer returns the goods, you can also settle the return here.
Offer List
When a customer adds one of your goods to the shopping cart and has an offer generated as a PDF, this offer is automatically listed in the offer list.
To view a offer in detail, click on an offer in the table and a new menu will open:
| Option | Description |
|---|---|
| Home | Here you get an overview of billing address, order data and order data. |
| Download | Here you can download the offer as a JSON file. |
| History | Here you can see when the offer was retrieved via API, i.e., generated. |