Switch back to German
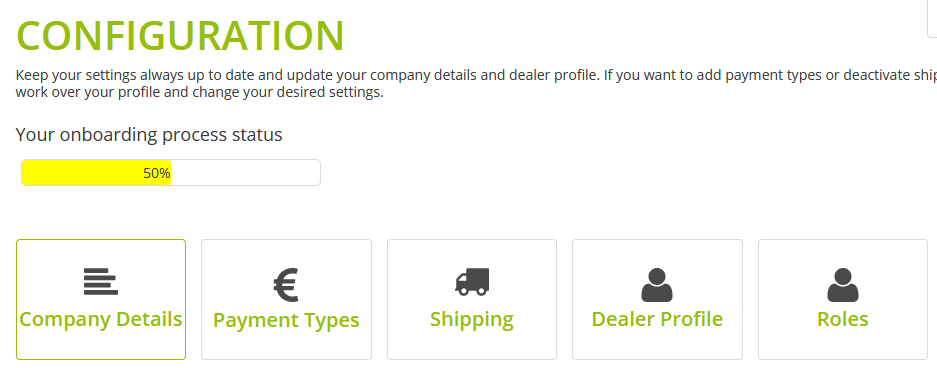
Configuration
In Configuration, you enter all necessary information about your company, payment types, shipping, dealer profile and roles.
Company Details
The marketplace operator needs your company details such as company name, name of CEO and address. When you change this data, you create a change request that the marketplace operator must approve.
Upload "USt-Bescheinigung" (VAT certificate)
Since 2019, the "Gesetz zur Vermeidung von Umsatzsteuerausfällen beim Handel mit Waren im Internet und zur Änderung weiterer steuerlicher Vorschriften“ (Act on the Avoidance of VAT Losses in the Trade of Goods on the Internet and on the Amendment of Other Tax Regulations) has been in force and requires marketplace operators to request proof of registration as a taxable person from their marketplace participants.
You must apply for the certificate at the relevant tax office. You can then upload the certificate issued by the tax office here.
Correct form of the "USt-Bescheinigung" (VAT certificate)
-
The certificate is issued, stamped and signed by the responsible tax office according to §22f UstG.
-
Your name, the company name and contact details on the certificate must match with the data on the marketplace.
-
The "USt-ID" (VAT ID) must be noted on the certificate, if one is available.
How to:
-
Got to Configuration > Company Details.
-
In the Certificates of registration as a taxable person (entrepreneur) area, click the Durchsuchen button.
-
Select the file of the certificate and click on Open.
-
Click the Upload button.
The uploaded file appears in the table with the value n.A. in valid until.

The marketplace operator must declare the certificate as valid and enter a "valid until" date for it. If they have entered this value, you will see it under valid until.
See also:
Check USt-ID (VAT ID) manually
Create a Company User
You can create users for your company and use roles to determine which features the users have access to. You can, for example, give a user with the Marketing role access to the Customers and Statistics features.

How to:
-
Got to Configuration > Company Details.
-
In the Existing users within this company section, click the New User button.
You will be prompted to enter an email address.
-
Enter the email address of the new users and click on Weiter.
A form will open.
-
Enter at least all options with * and click on Save user.
The new user receives an email and can set their passwort.
See also:
Roles
Edit or Delete a User
How to:
-
To change user data, click the
 Edit button.
 -
To delete a user, click the
 Delete button.
Payment Types
You must register with Novalnet, a payment provider and acquirer. It enables secure payment transactions between all marketplace participants. This service provider handles all common payment systems such as:
-
Invoice
-
SEPA direct debit
-
Foreign debit cards
-
Credit cards
You must define other payment methods like prepayment additionally if the marketplace operator offers them. Please note the information in
See also:
2. Register with Novalnet
Shipping
To be a merchant on the marketplace, you must
-
define shipping methods
-
define shipping regions
-
define and test shipping cost rules
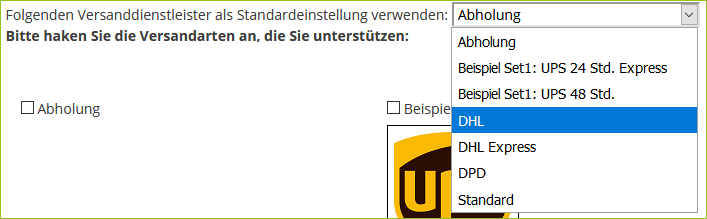
Define Shipping methods
The marketplace operator defines which shipping methods you can use. Based on this preselection you must select your shipping methods. Customers can then select the activated shipping methods in the check-out process. You must always define a default shipping method.
How to:
-
Go to Configuration > Shipping > Shipping-Methods.
-
Select a default shipping method:
-
Select the shipping methods that you support.
-
Click on Save.
UPS Settings
If you use the shipping service provider UPS, you have to enter your UPS credentials in the backend.
How to:
-
Go to Configuration > Shipping > Shipping-Methods.
-
Under the UPS logo, click the UPS-Settings link:
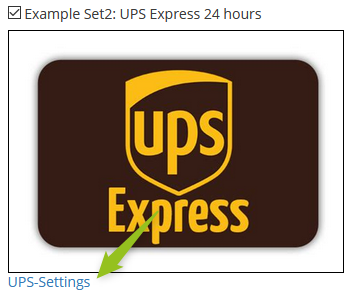
A form will open where you can enter the necessary data.
Afterwards, you can manually add shipping information to an order or directly print a UPS label and thus trigger shipping.
See also:
Add Shipping Information Manually
Create UPS Label
Define Shipping Regions
The marketplace operator defines which shipping regions are available. Shipping regions are a group of countries with the same shipping conditions and save the need to define shipping rules for each individual country.
You find the regions under Available countries. Based on this preselection you must select your shipping regions.
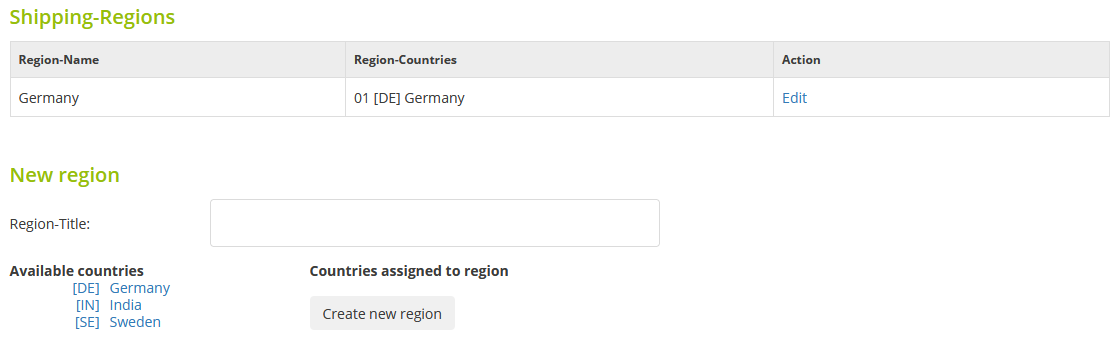
How to:
-
Go to Configuration > Shipping > Shipping-Regions.
-
In the Region-Title field, enter the region name, e.g., Germany.
-
Under Available countries click on a country, e.g., [DE] Germany.
-
Click on Create new region.
The new region appears in the table under Shipping-Regions.
Define Shipping Cost Rules
Shipping methods and costs depend, among other things, on the country, weight and value of the goods. You need to specify which shipping method the marketplace should offer once, for example, a customer in the US places an order for a 30 kg product.
If you do not assign a country, the shipping method applies to all countries.
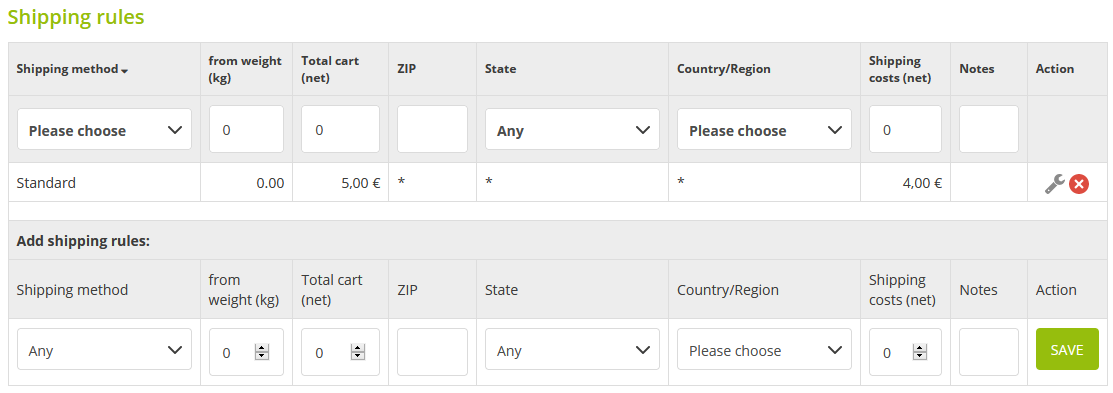
How to:
-
Go to Configuration > Shipping > Shipping cost rules.
-
Under Add shipping rules, enter details to the new shipping cost rule.
-
Click on Save.
The new shipping rule appears in the table above.
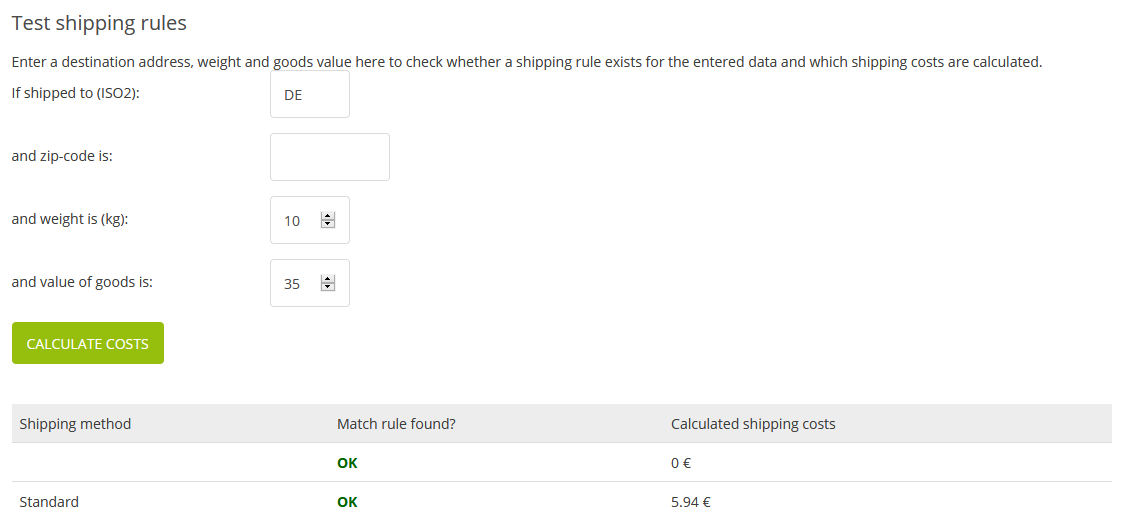
Test Shipping Cost Rules
You can test your defined shipping cost rules. If a rule is found, you will receive a confirmation with OK. The calculated shipping costs correspond to the gross value.
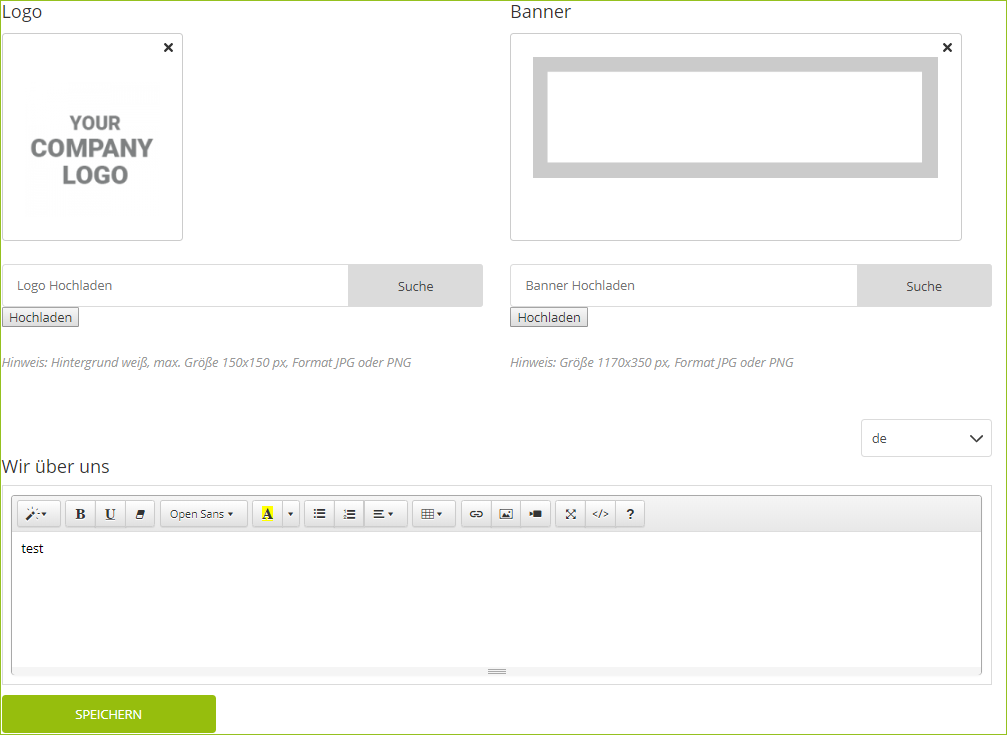
Dealer Profile
You receive your own merchant site on the marketplace. This page contains your logo, a banner, a short introduction text and the legal texts. The options that you have for legal texts depend on the settings of the marketplace operator. You can enter your texts in German and English by default.
Roles
If you create users, then you can use roles to define which features the users can access. This access influences the menu bar at the top.

There are 3 roles altogether but you can only define access rights for 2 roles:
-
Administrator
-
Marketing
-
Order Processing
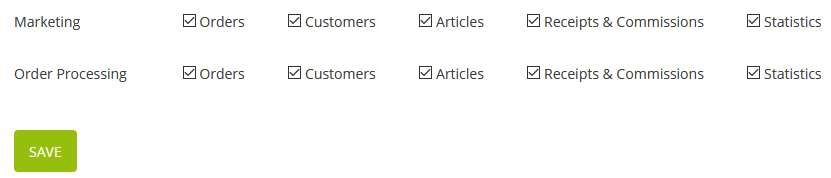
The administrator always has access to all features and can assign access rights.
See also:
Create a Company User